
Our previous article explained how to withdraw bitcoin from an exchange to your personal wallet. This article will cover how to send bitcoin from your personal wallet back to the exchange.
Requesting a Bitcoin Address from the Exchange
Exchanges generate unique bitcoin addresses for each user. When a user sends bitcoin to this address, the exchange automatically adds it to their balance.
Exchanges don’t share the secret words (bitcoin passwords) of these addresses with users — they store them in their databases.
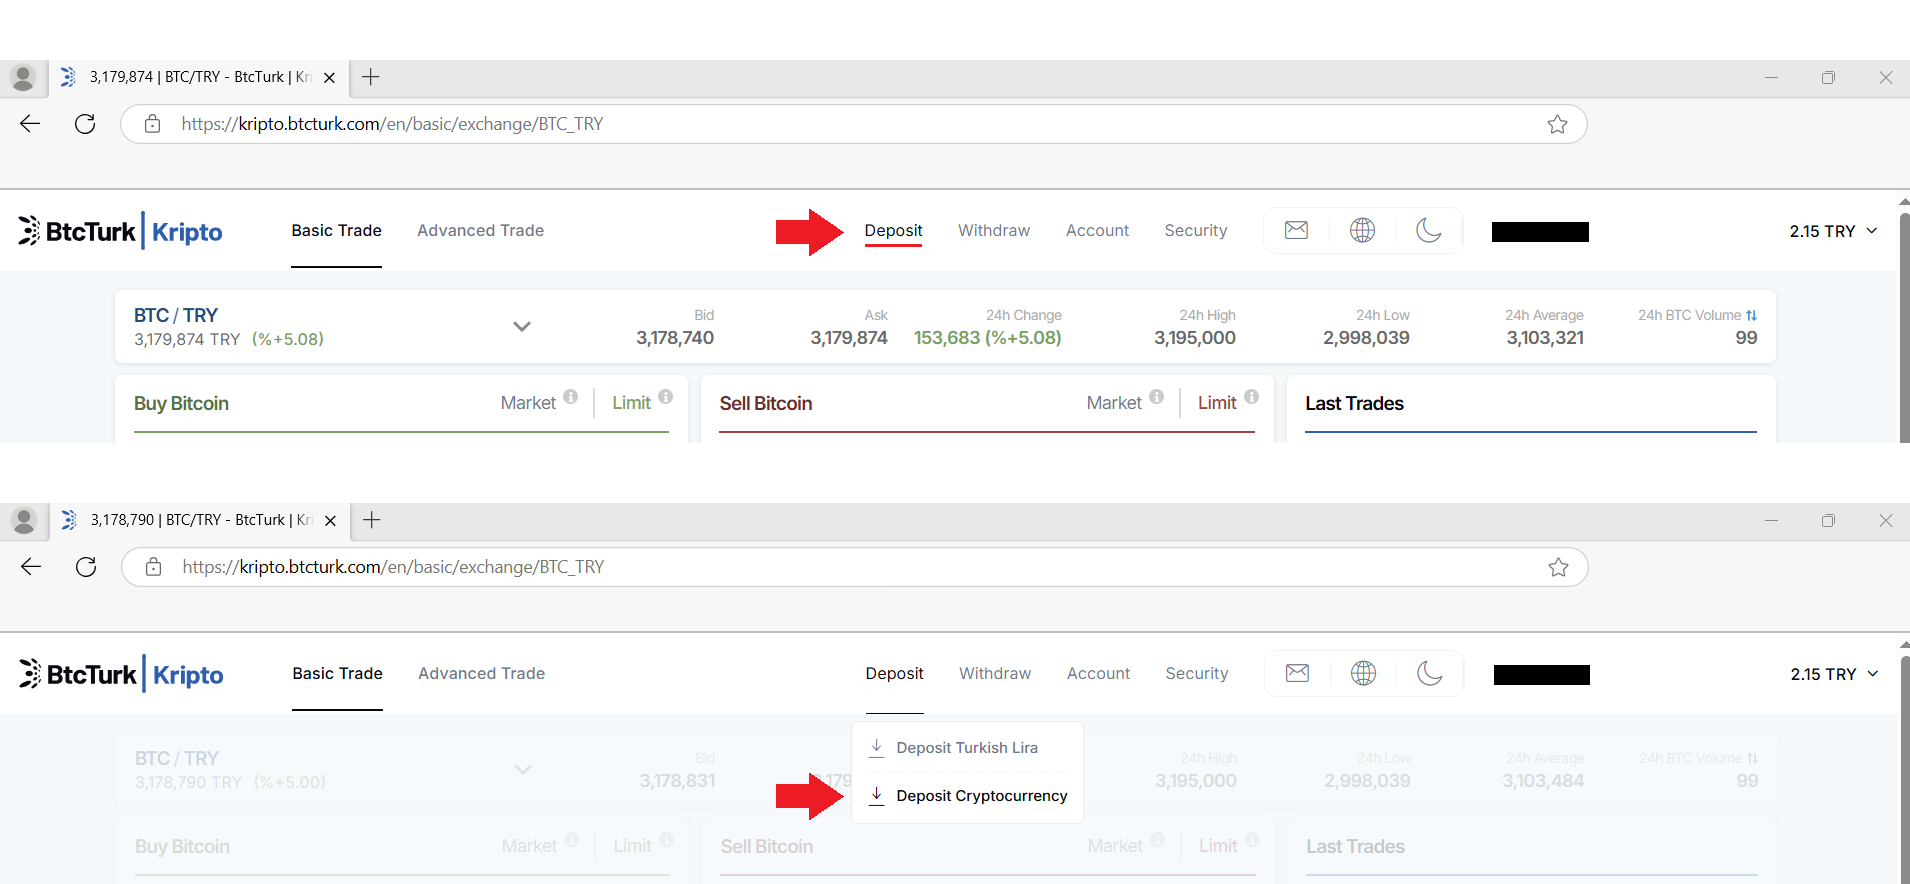
Some exchanges automatically generate these addresses when the user signs up, while others generate them only upon the user’s request. BtcTurk creates a bitcoin address upon request. To obtain a bitcoin address from BtcTurk, open the exchange’s crypto deposit screen (Images-1,2).
On the opened screen, the exchange will ask you to select the address format you prefer. The “Next Generation Bitcoin Address (Bech32)” is the most suitable choice for beginners. Click the “Get Address” button to generate the address (Image-3).
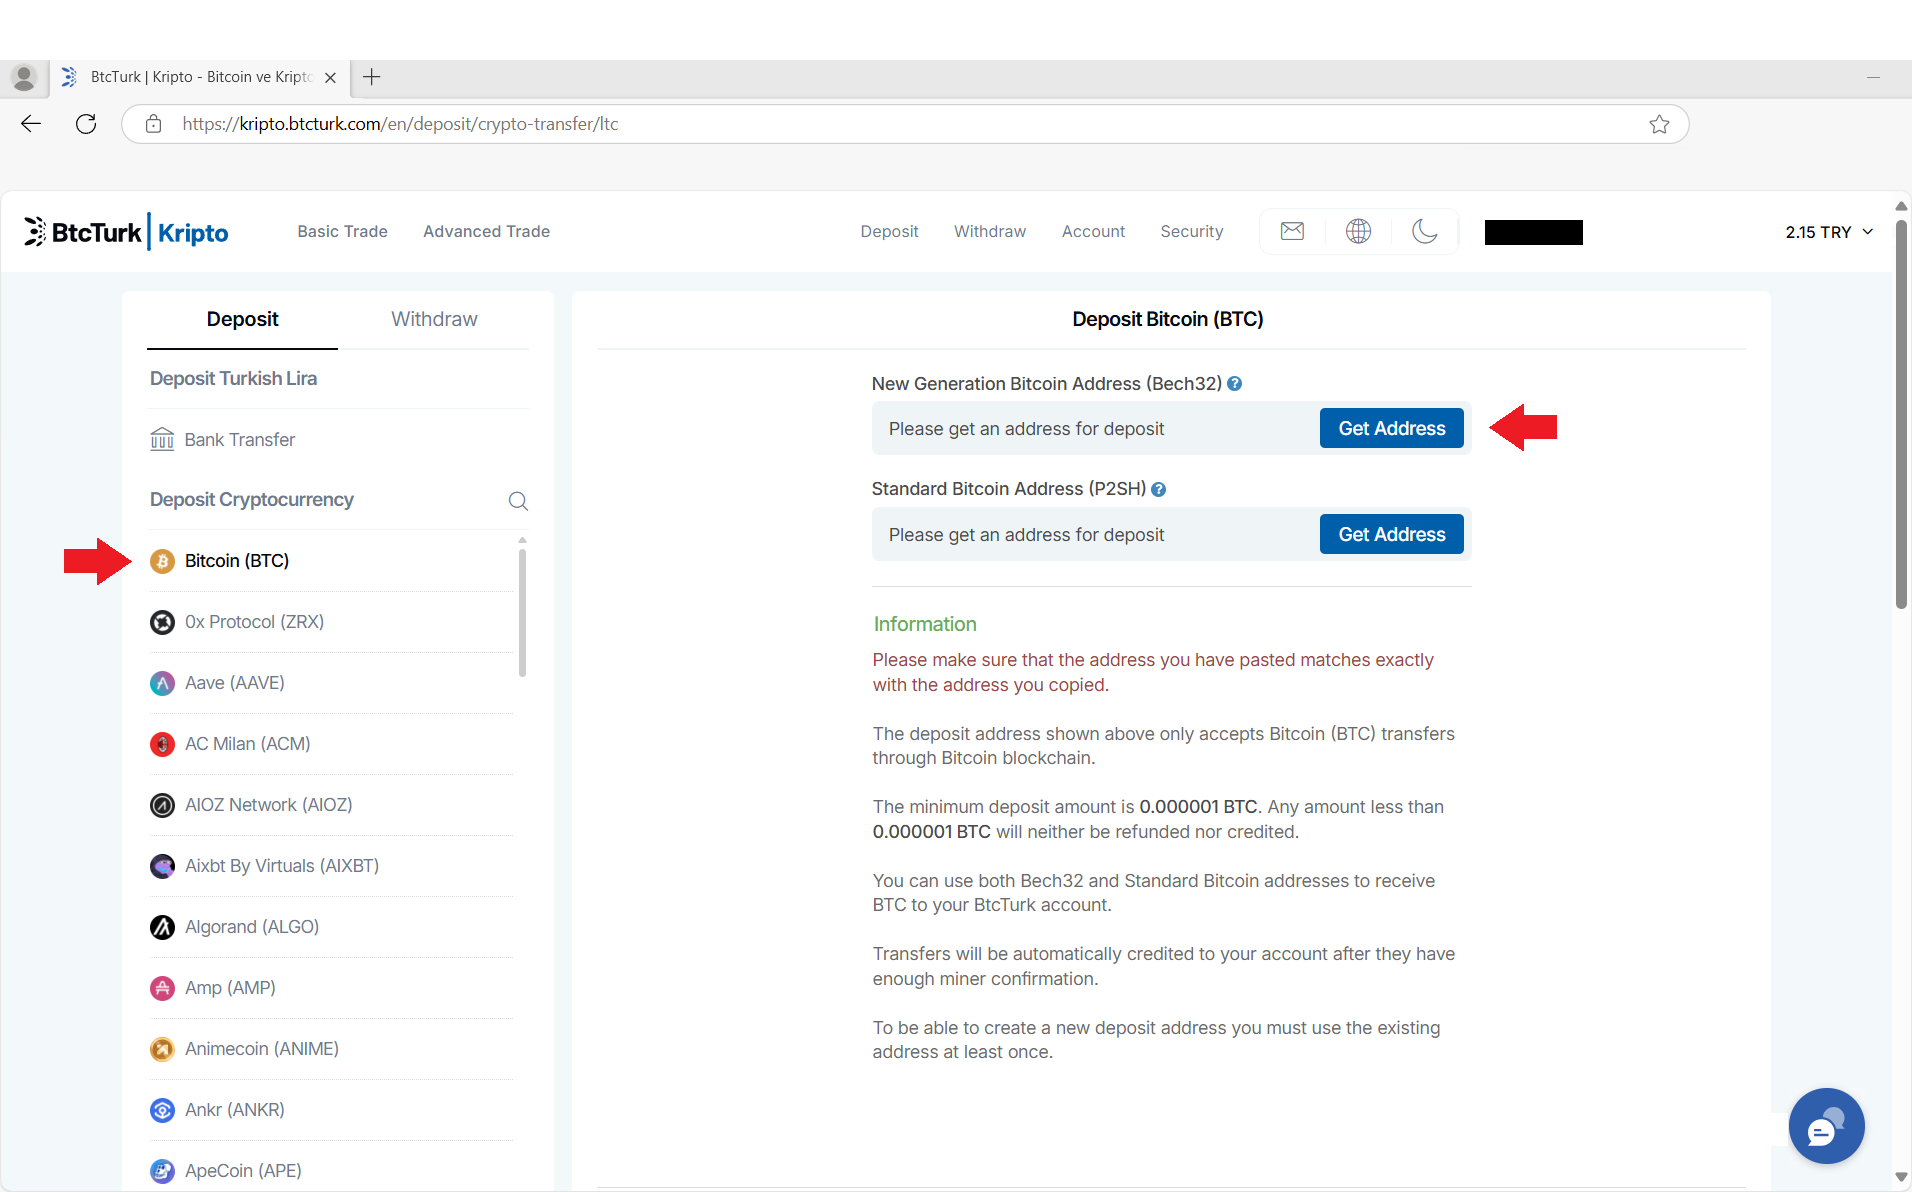
The exchange will create a 42-character bitcoin address starting with “bc1q…” (Image-4). You’re now able to use this address to deposit bitcoin from your personal wallet. Be aware: The address displayed on the exchange interface may show fewer than 42 characters. To see hidden characters, click the address box with your mouse cursor and press the right arrow key.
Exchanges may provide addresses in different formats. Bitcoin addresses can come in four different formats, each with its own prefixes and character lengths. These prefixes are “1,” “3,” “bc1p,” and “bc1q.” The most commonly used format is “bc1q.”
BtcTurk creates bitcoin addresses that start with “bc1q,” too. The address we created with the Electrum wallet in our previous article is also a “bc1q” formatted address.
Even if the exchange gives you an address starting with “1,” “3,” or “bc1p,” you can still send bitcoin from your personal “bc1q” wallet to it — they’re all compatible. Bitcoins can be transferred across different address formats. We won’t go into why different formats exist because this requires a technical explanation beyond the scope of this article.
Sending Bitcoin
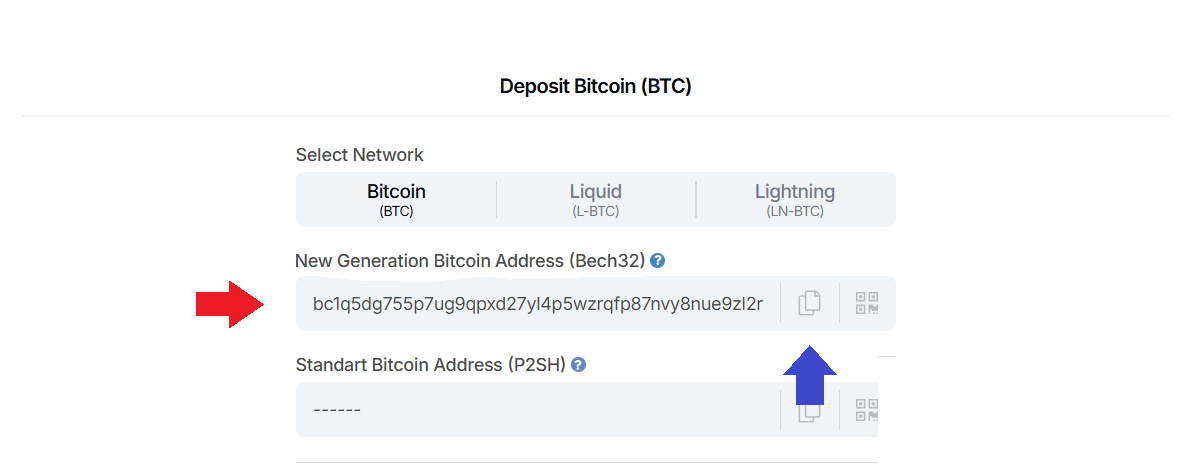
After obtaining the bitcoin address from the exchange, open the Electrum application. Before starting the transfer, there’s a small setting you should set up first for convenience. To do this, follow these steps (Image-5):
- Go to the menu bar and select “Tools –> Preferences –> Fiat.”
- When the window opens, choose USD from the “Fiat Currency” list.
With this setting, you’ll see how much the bitcoin you’re sending — and the transaction fee — are worth in USD.
Now you can start sending bitcoin by following these steps (Image-6):
- Open the “Send” tab.
- Copy the address from the exchange and paste it into the “Pay to” field.
- Enter the amount of bitcoin you wish to send in the “Amount” field.
 WARNING: Never manually type the exchange’s address into Electrum. Always copy the address using the “Copy” button next to the address box on the exchange’s website, and then paste it using the “Paste” button next to the address field in Electrum. Always double-check the characters after pasting. If you type the address manually, you might enter it wrong and send your bitcoins to the wrong address — with no way to get them back (Image-7).
Also, never share your seed phrase, bitcoin password, or exchange password with anyone — including the exchange itself. Exchanges don’t need this information to accept your deposit, so there’s no reason for them to ask for it. If the exchange or someone who claims to be from the exchange asks for your secret words, bitcoin password, or exchange password, it means you’re being scammed. In that case, do not proceed with the transaction; report it to the exchange’s official support email.
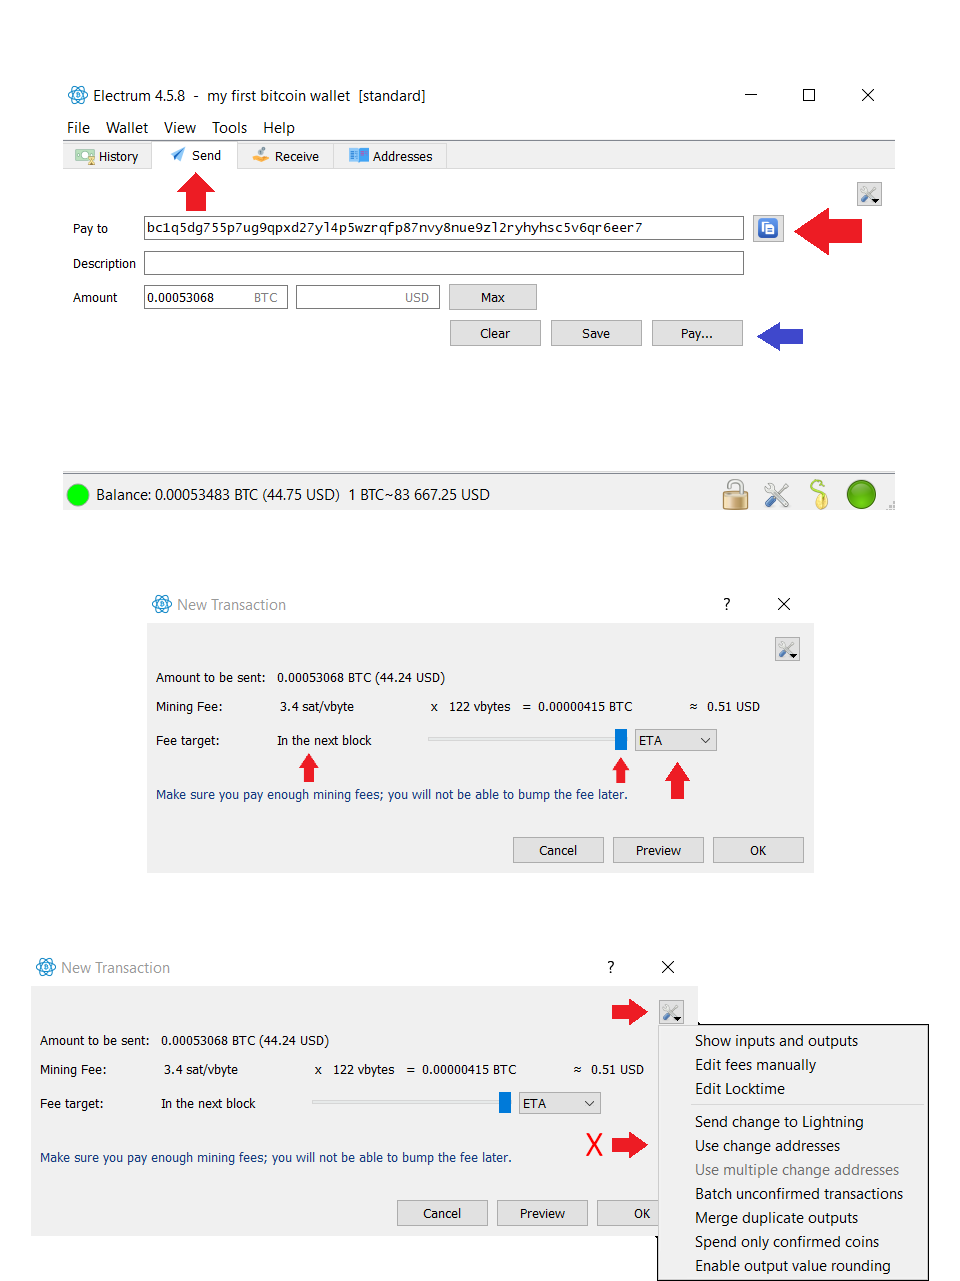
After checking everything you entered, click the “Pay” button. A screen for setting the transaction fee will appear (Image-7):
- In the “Fee target” row, you’ll see a slider and a dropdown list labeled “ETA” (marked by blue and red arrows).
- The dropdown list typically defaults to “ETA.” If it’s not selected, choose it.
- Move the slider all the way to the right.
- After these steps, you’ll see the text “In the next block” appear next to “Fee target.”
The “In the next block” indication means your transaction will be processed right away. After adjusting the settings, double-check the final details on the screen one final time (Image-6, 7):
- The “Amount to be sent” field shows how much bitcoin you’re sending.
- The “Mining Fee” field shows the bitcoin amount you’ll pay for the transaction fee.
- The total amount withdrawn from your wallet is the sum of the “Amount to be sent” and the “Mining Fee.”
Note: Even if “Next block” is indicated, occasionally, the transaction may not be processed as quickly as expected and could take several hours. Such delays are rare. Explaining why this happens is a bit technical, so we’ll cover it in another article.
- After that, we need to check a setting. Click the “Settings icon” located on the commission settings screen (Image-7.1).
- When you click this icon, a menu will appear. In this menu, make sure the “Use change addresses” option is not selected. If it is selected, disable it (Image-7.2).
- Then, after a final check, click the “OK” button.
- After this stage, you will not be able to cancel the transfer. Therefore, click the “OK” button only after making sure everything is correct.
Checking Transaction Status
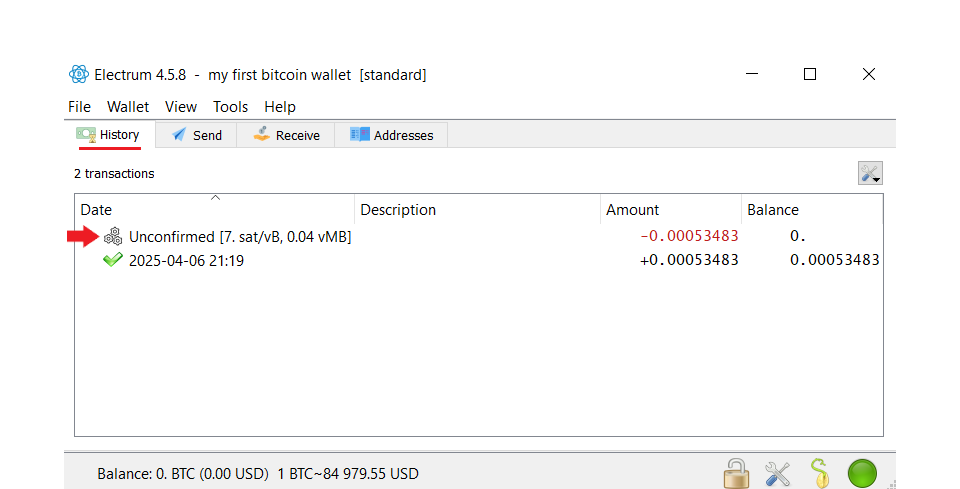
After initiating the transfer, open the “History” tab (Image-8). In this tab, you can see your transaction status. Right after it’s sent to the network, the transaction will show up as unconfirmed.
A new block is created on the bitcoin blockchain roughly every 10 minutes, and transactions are included in these blocks. Your transaction is partially confirmed once it’s added to the next block created by the network. After at least six blocks have passed, your transaction will be fully confirmed, indicated by a green checkmark next to the transaction details.
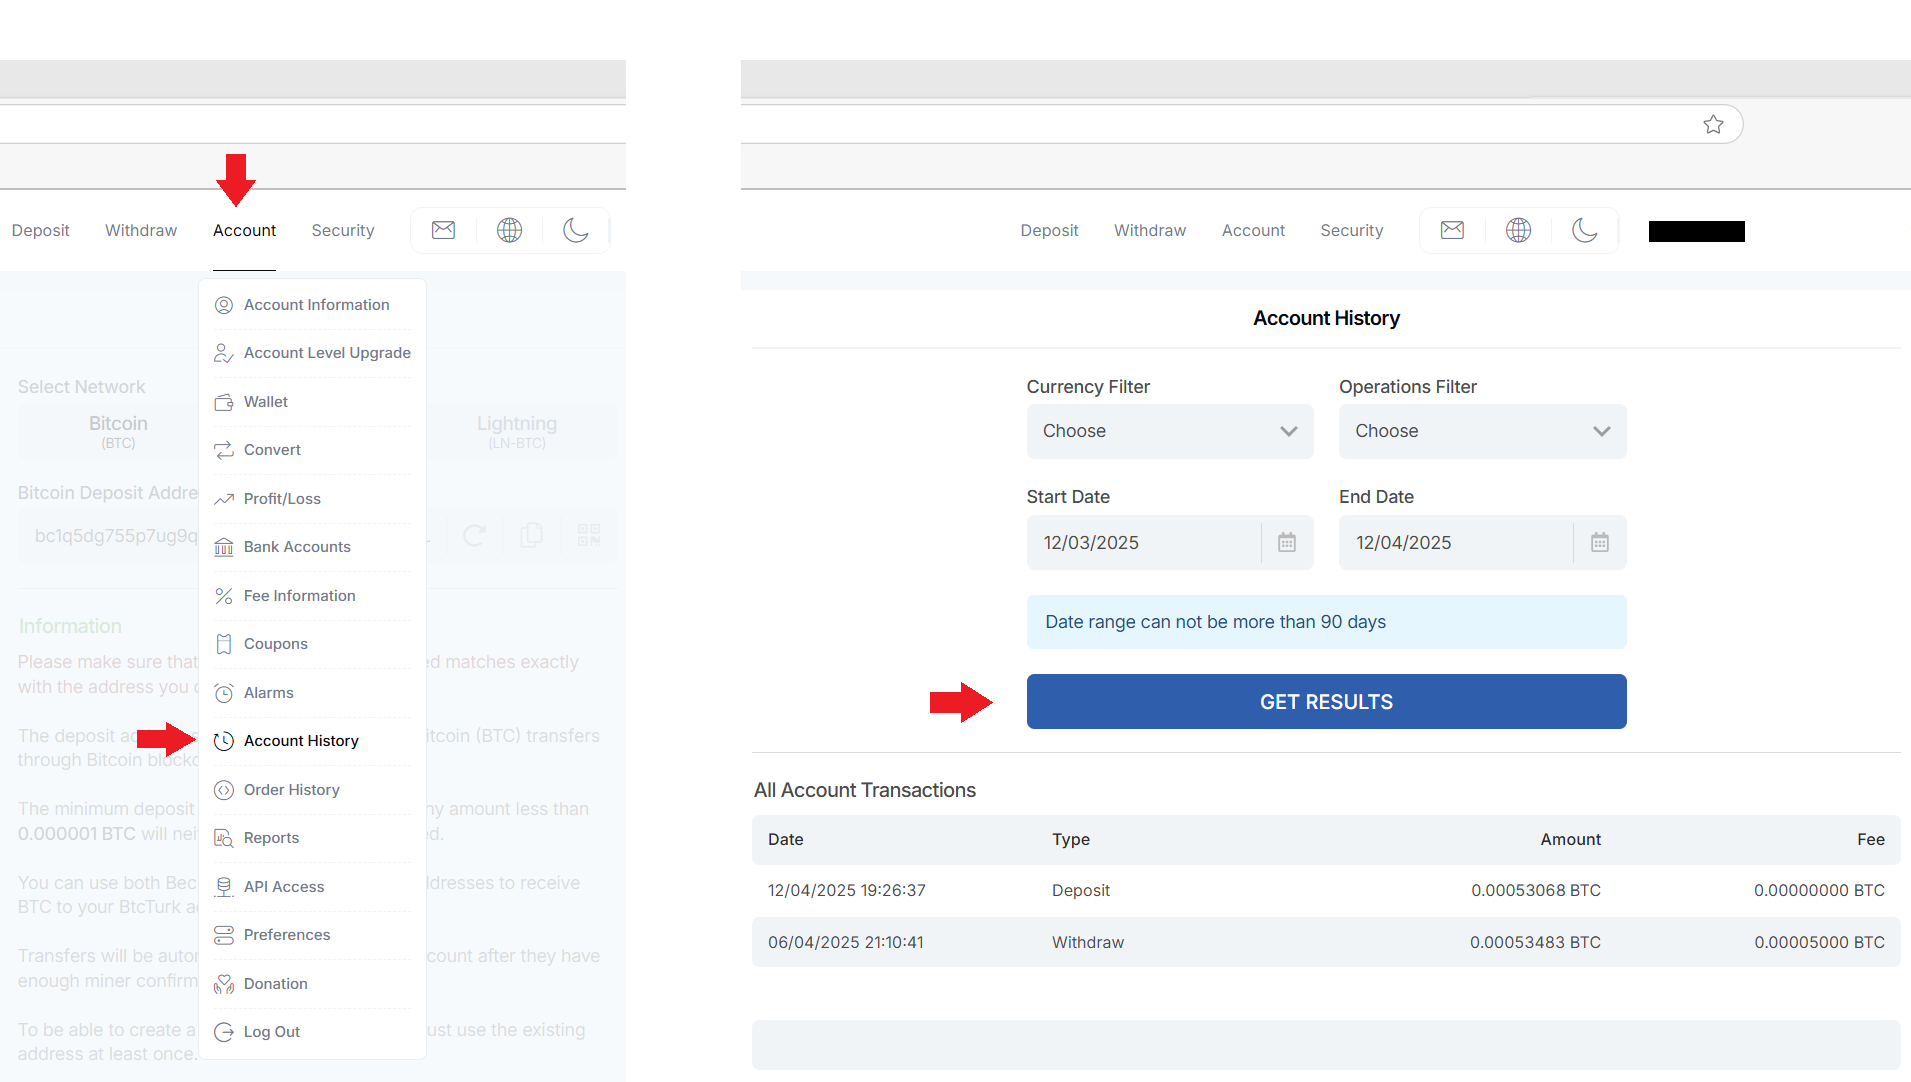
Most exchanges add bitcoin to your balance even before full confirmation, so your bitcoin will usually be available on the exchange within 10–15 minutes (Images-9,10).
Final Thoughts
In this article, we’ve explained how to deposit bitcoin from your personal wallet to an exchange. Our next article will cover how to manually adjust transaction fees, fix delayed transactions when the network is busy, and track your transfer.
I wish you a life that makes a difference.